To many the idea of coding, using math, logic and nerd power to create something sounds like magic. Looking at sites like Facebook or games like Skyrim you’ll feel overwhelmed by the mere prospect of trying to replicate it. I as a programmer do to. The reason I most often hear things like “this is why I don’t do code” is because people see some code which a person has worked on for hours/weeks/years. Even simple code can be made to look intimidating. Refusing to stick to naming conventions or using fussy logic will immediately make whatever your making look like something out of 2001 a space Odyssey.
Today I want to touch on this and give a few tips on how to start getting into coding, specifically basic HTML code. Most of my methods are however not rooted in code, but rather project management and pedagogy. So, if you’re just here to see how I teach myself stuff skip any code heavy parts and focus on why I’m choosing different methods and sites. As with everything else, I’m not an expert. These are observations ant tricks which I’ve picked up during my three years as a programming intern, lead programmer and project manager. My tenure as project lead led to the closure of the studio and to the extension of my three-year bachelor to a four year one, so these lessons came at a price.
First of a few links:
Why advice is dangerous, and you should take any with a grain of salt:
https://www.youtube.com/watch?v=miwrDpbb25Q
Why only looking at the successful people is a bad idea:
https://youarenotsosmart.com/2013/05/23/survivorship-bias/
Why you’ll probably never feel comfortable with your current skill:
https://www.themuse.com/advice/how-to-banish-imposter-syndrome-and-embrace-everything-you-deserve
Okay so you want to learn something, this time it’s basic coding. This might just be for the joy of learning in and of itself, it might be because you want to try your hand at making coding art. Well I got new for you, this might take some time. It depends on how complex and out there you want to be. If you want to make a bad first-person shooter in Unity it will maybe take you a day in unity using their premade assets. You’ll have a project which runs, but you’ll be at their mercy. So instead we’ll start with something small. By starting small you’ll get a better grasp on how the basics work.
So lets head over to my favourite website currently present on the world wide web http://sau.no/. Sau.no is a small site which tells you everything a metropolitan need to know about sheep.
The text says:
Sheep are stupid animals.
Sheep are food for among others, wolves.
Simple and clean. All text is cantered, there is a picture and a link to another html site, wolf.no. At your current level, can you replicate this site without looking at it source code? If yes, then this tutorial is probably not for you. Scroll down for the epic conclusion or follow along and wince as I misrepresent coding and learning methods. If no, then please stay a while and listen play.
First off, this site is old and breaks a few conventions in web development, but trust me, caring about conventions and correct code to early will only stop you from having fun. And having fun while learning is paramount. First of you’ll need something to write your code in. I can recommend notepad++ as a good starting tool (I still use it for quick development and people who say that it’s trash are only thinking of large scope projects). If you don’t want to download anything you can just use any old text editor like notepad to follow along. Once you have notepad++ up and running you will see something like this:

This will be where the magic happens and as we know, all magicians cheat. So, lets cheat, go back to sau.no, right click an empty part of the screen and choose “View Page Source”, this will open a new window showing you all the code needed to create this marvel of a website. First of we have what are called tags.
Tags helps our computer run things in the right order while also classifying what we are doing in a computer readable way. The first tag we encounter is the <html> tag. This bad boy tells the computer that the following code is supposed to be html. This first tag is linked to the very last tag of the document, the </html> tag. The / symbolizes that we are no longer playing with html. If you’ve coded a bit before you might be rocking a bit back and forth right now. Where is the !DOCTYPE? Well in never time we add a declaration at the start of any html document to signify what version of html we are using. Never versions have many fancy smancy things it can do, but sau.no is so pure (and old… and mouldy) that it does not need to declare anything. If you really want to be proper, then look at this site to see how and why DOCTYPE is a good thing:
https://www.w3schools.com/tags/tag_doctype.asp
In the link you’ll also encounter the other basic tags which comprise a basic html page. The head, title and body tag. The head tag is where all your meta and dark magic usually goes, for now just thing of it as a place to add the title tag
The title tag is always placed in the head tag and for good reason, nothing you write in the head tag should show on your site. The title tag rather, changes the text in your tab/window so that anyone visiting your soon to be brilliant site knows what’s up.
The body tag is where all your content goes, all text, images etc goes here.
So, let’s set up the essentials. Write or copy paste the code from the sau.no source code into your editor (notepad++ and the like). Remove everything which is not one of our four known tags. Now your code should look something like this:
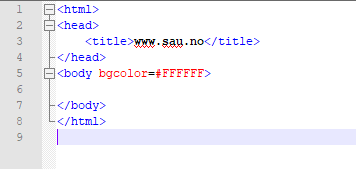
The body tag has some weird colour code, but lets ignore that for now because it’s time to take a look at our creation! Save your html code wherever you want, I recommend making a specific folder for the project. Remember to save your file with the .html ending! If you save it as sheep.txt for example it will not be recognized as html code. Once saved, open it up in your favourite browser and behold what you’ve created!
….
Not much to look at for the moment, but your tab should now read ww.sau.no. Let’s change this by adding some stuff inside the body tag. We’ll do this in the quickest manner, so just go ahead and copy paste everything from the source code into your document. Now you got a center tag, some br tags, fonts! An img tag and a sprinkle of a’s and b’s.
Every last one of these tags are here for a reason and this is where we’ll get into why this is a good way to learn coding. Every coding language has what’s called documentation. Documentation is the rules and functions of your chosen language and the best way I’ve found to grasp the basics is by finding simple projects and slowly read up on every piece one by one. You might have guessed what the center tag does from it’s name, but google html center tag. This will most likely bring you to wc3schools page on the topic. You’ll find that it’s not supported by newer versions of html and that you should use css. This is what I’ve dubbed a breadcrumb. These breadcrumbs are future reading topics to explore after you’ve understood your current project. I’ll probably make a short tutorial on how to use css to style your page later, but for now just remember that the center tag changes the layout of your html page and should therefore probably be done with css.
The same goes for the font tag where we find our second breadcrumb of interest. Under compatibility notes we see a snippet of css code where they use something called a p tag. Whenever I stumble upon an unknow tag which I’m not using I note it down somewhere and check it out later.
So, after reading up one the different tags used in the source you should know that most of the clutter is styling code. Centring code, adding fonts, resizing and adding space. The only two tags that seems to really belong here is the a and img tag. The img tag tells your computer that you want to grab a picture with a specific name and size. Lets go ahead and download the picture of the sheep from the site and place it in the same folder as sheep.html file. If you place it somewhere else, it will not be found. This is due to file hierarchy playing a role in how we fetch images. The src=”sau.jpg” text indicates that you file is named exactly that. If you renamed the file you will have to use the exact name that you chose. If you wanted to have a folder of images instead of having them in the same space as the sheep.html file you would have to do something like scr=”folder/sau.jpg” or if you wanted to have your .hmtl file in a folder it would be scr”//sau.jpg”. the double slashes pushes you one folder up, again google is your friend.
Lastly, we have the a tag, which is a simple link. Inside the href you’ll find url to whatever site you want to point at. Let’s change this to the url of this blog so that I get more clicks. Now it really makes no sense to have the word ulv (wolf) pointing at my site so let’s change the word to “narrer” (jesters). And with that you have a complete site! A near perfect rip-off.

Sligthly varied results are expected
On the way you learned the very basics of html. You have also picked up quite a few bad habits. Styling in the html code instead of in css and omitting the !DOCTYPE, but you have made something. And by making this ripoff you now have a few breadcrumbs to follow. What is css and how do it use it to style my html? Can I use something else than text as a link? How do I remove the stupid blue colour from links? Can I use other images with different sizes? Is there a better way to make headlines than size? Can I imbed auto playing music or YouTube videos?
By starting small you will build up a vocabulary and knowledge of how things work. Don’t make something perfect from the start. Use old faulty methods if they work and change it out once you’ve learned why the new method is better. Make a note of what sites suggests you should do instead, but wait with the upgrading for later. The goal is learning and having fun, not making something a seasoned coder can look at and musingly say “hmm yes this is clean code”. By experience coders never really do this even if the code is sound.
That is the end of my needlessly long tutorial to replicate an old website from the late 90s. While it might be much MUCH faster to just copy paste the code and add more stuff on top I hope that you’ve gleaned an insight into how you can learn from the process and why it’s helpful to take your time in creating basic stuff. Do you have any good tricks for making learning fun? Maybe you already have a tutorial for making twitter bots or gifs? Feel free to post them in the comment section or @ me on twitter and maybe I’ll make a post about trying them out.